SQL Server Best Practices With the new 2008R2 servers that were recently built, I am hoping to institute some standard best practices on the boxes moving forward. The first one was to move the TempDB to its own drive on a separate LUN and since I have moved a TempDB before, no problems here. The second best practice was to make a separate drive on a separate LUN for the databases and log files, check and check. The third practice was to move the system databases, which sounded simple in theory but I have never done it before, uncheck–it did not work.
I followed Microsoft’s directions but it did not cover my contingency. The following excerpt is taken from Microsoft’s MSDN site for SQL Server 2008 R2 in order to Move the Master Database, with changes for my separate drives.
From the Start menu, point to All Programs, point to Microsoft SQL Server, point to Configuration Tools, and then click SQL Server Configuration Manager.
In the SQL Server Services node, right-click the instance of SQL Server (for example, SQL Server (MSSQLSERVER)) and choose Properties.
In the SQL Server (instance_name) Properties dialog box, click the Advanced tab.
Edit the Startup Parameters values to point to the planned location for the master database data and log files, and click OK. Moving the error log file is optional.The parameter value for the data file must follow the -d parameter and the value for the log file must follow the -l parameter. The following example shows the parameter values for the default location of the master data and log files.
Stop the instance of SQL Server by right-clicking the instance name and choosing Stop.
Move the master.mdf and mastlog.ldf files to the new location.
Restart the instance of SQL Server.
Here is where I had my issue, it would not restart. Through my troubleshooting I realized that the new folder did not have the same permissions as the original folder. I added the SQLServerMSSQLUser$$ user that was created by the SQL installer. Problem solved.
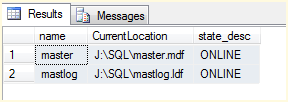
Verify the file change for the master database by running the following query.